TRANSLATE

Tuesday, January 15, 2013

AM I CRAZY?

Does anyone know why we can't upload pictures from our pc anymore?
I had to open a Picasa web album to be able to place the peacock room pictures on my blog.....
I thought perhaps it was an issue with IE and upgraded to version 9 but that did not help.

I hate that version, too. It would be better if I could hide my favorites and then call it back up with one button like I did on version 8. I may just not know how......???

Any suggestions would be greatly appreciated.

THANK YOU ALL SO MUCH FOR YOUR VERY NICE COMMENTS ON MY MINIATURES.
I DO HOPE TO BE ABLE TO POST MORE OFTEN AND PUT MORE TUTORIALS UP.
WE'LL SEE........

Saturday, January 12, 2013

PEACOCK LANTERN

HELLO OUT THERE IN BLOGGER LAND.....
LONG TIME NO POST!
I finally finished one of my lantern rooms; the black colored one with the wide black stripes on the back walls.
I made it into a peacock reading corner.  

Stem wire makes the quill; eyes are reduced pictures cut out and glued to the end of each wire. Paint the wire with white. Run a thin bead of glue along the edge of black cotton fabric, let dry and cut a strip about 1/2 inch wide. Pull threads to ravel the edge as shown. Glue the strip to the "back" of the wire and up around the edge of the "eye" and back down the other side. Let dry and then trim at a sort of jagged edge; highlight with a gold marker/pen and place in a vase.


Thursday, December 13, 2012

BIRDS ON A WIRE..........TREE

Finally finished the birds Christmas Tree...
It does not photograph well as the ornaments are so light they keep turning in the slightest breeze.

There are Silver, Gold and Copper color birds.

Merry Christmas, Everyone!


Monday, November 26, 2012

2012 CHRISTMAS TREE


Working on another Christmas Tree with birds as the theme........
I found these beads years ago in FireMountain Gems or Shipwreck Beads (can't remember which) and bought them specifically for bird ornaments. They are called "Party Beads". I have tried to find them again and sad to say they are no where to be found online.
Anyway, they remind me of the vintage glass bird ornaments from long ago.
These can be made from pearls or any other kind of 4mm round and 4mm x 9mm(?) teardrop shape beads.
3mm or 4mm jump rings seat the head on the body using a drop of super glue.
No hole beads make the eyes (fill in the bead holes on either side of the head), 32 guage brass or silver wire makes the curlicue and hanger on the top of the head, a tiny snip of 28 guage wire makes the beak and silver or gold metalic thread makes the tail feathers.
Hopefully I will be able to finish this before Christmas.
Hope everyone had a great Thanksgiving, for those who do celebrate it. I have come to think of every day as a day for giving thanks, though. I know a lot of people all over the world have a really tough time but there are still many blessings we can be grateful for. I thank God everyday that I woke up and if I should not wake tomorrow then I know my soul is secure in Jesus Christ. That is the greatest blessing of all!


Tuesday, November 13, 2012

Early Christmas.....

Made a tiny wire tree with ornaments for a friend and wanted to share a picture.

The Santas are made of 5mm painted (red nail polish) and 3mm plain pearls. The hats are teeny 1/8 punches of white felt and a red seed bead to top off. The belts are black buttonhole twist thread highlighted with yellow acrylic paint for the buckle. Snowmen are 4mm and 3 mm plain pearls with a black sequin and black seed bead to make their hats. They wear red thread scarves.
Details are added with acrylic paint.
All are threaded onto straight silver jewelry pins and the top curled over for a loop.
The tiny trees are snipped-into-shape points of chenille stems stuck into gold painted e-size beads. Had to add jump rings to the tops of these for a hang loop.
There are 18 arms on the wire tree with one in the center (total 19) to hold the 18 ornaments (6 of each) plus the star.
************************************
I am hoping that our issues will be resolved soon. My husband has had to take early retirement on disability due to his Multiple Sclerosis. It is a big adjustment for both of us.
Lots of details to cope with!
Anyway, not a lot going on with my minis but maybe things will settle down before long.

Merry Christmas to all of you out there!

Wednesday, October 24, 2012

THE LITTLE HOUSE

ETSY Shop Announcement

Please note that once my current items and quantities listed have expired and/or have sold I will need to close my shop for a little while. I have some personal issues that need to be resolved before I am able to make more minis for sale.
Thank you to all who have purchased my minis and those who also favorite my shop and items.
I will continue to blog when I can and try to have tutorials and new minis to show you.
 

Wednesday, October 17, 2012

Cascade Bonsai


Finished the Cascade Bonsai I have been working on. It takes a little while to twist the wire framework and then arrange the branches. After painting, you have to arrange the branches again. When dry you can add the foliage in tiny bunches. Made the pot from regular white Sculpey and then painted with an avacado color craft paint. After that was dry, I aged and antiqued it with a transluscent wiping stain.
The stand is just bent florist wire (18 gauge) painted with Krylon hammered look spray paint in a burnished gold color.

This is the framework I started with. I was able to work a hole into the bottom of the trunk and super glue a heavy wire into that for a handle. I stupidly clipped my roots off before thinking. I added several coats of my glue and paint mixture I keep on hand just for adding "bark". It's easy to add small bumps and creases here and there with your built-up coats.

Below are some pictures of another tree I am working on. Not sure if it will be a bonsai or maybe a standard style rose bush for my florist shop landscaping. Anyway, this is the method I use for any bush or tree I am making. Needless to say, it is a MUST that you study your subject in real life or at least a very good picture of it.


Start with 28 gauge (or even smaller) craft wire.

Wind around your hand at least 25 times.

Put a round dowell in one end of the loops...

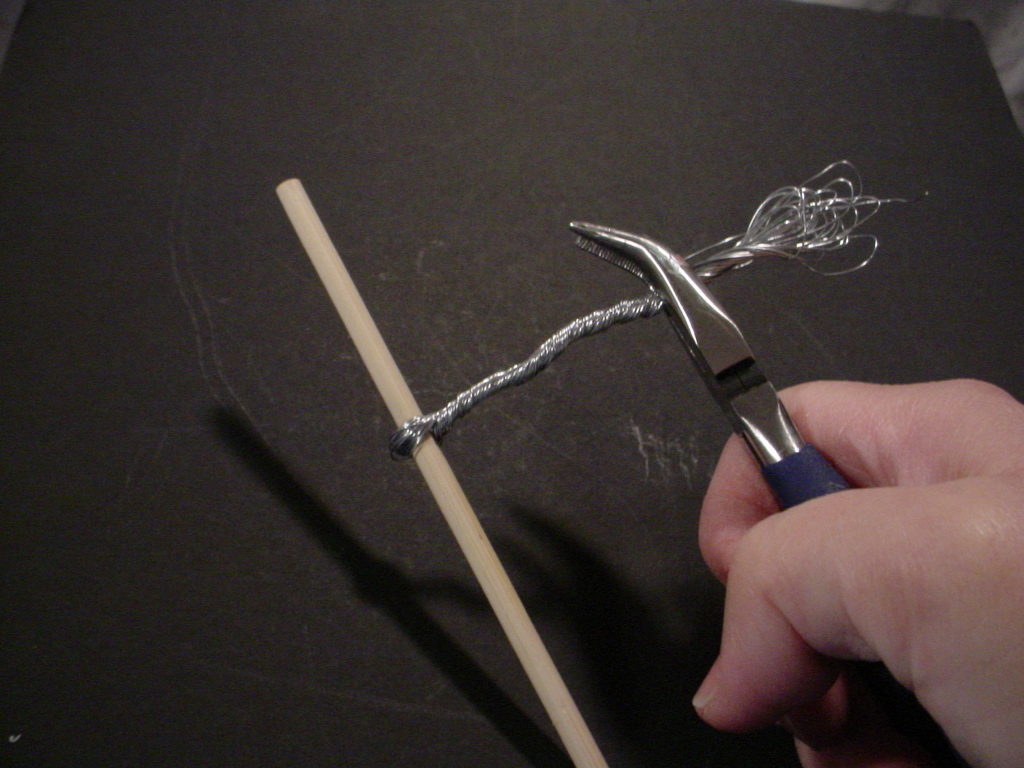
...then twist a trunk about halfway up.

Cut the loops on the other end.

and spread groups of 5 to 7 wires for each limb out from the top of the trunk section.

Twist each group out to about 1/4 inch then divide the remaining wires of that limb into two or three "forks" or branches and twist those out about 1/8 inch.

If you need to add another limb, cut several, usually 4, pieces or your wire about 3 inches long, fold in the center and loop around the trunk. Twist tight up to the trunk and out to about 1/4 inch and carry on as for the other limbs.


Trim the long ends/tips of the branches leaving about 1/8 inch or a little less for each tip.


Remove the dowell and snip the loops, then spread them out for "roots" to make your tree stand up. Later this is planted, as it were, into your pot or landscaping and covered with glue and soil or mulch. I use dried tea left from my used tea bags. I spread them onto a cookie sheet and put them in my oven with just my oven light turned on, leaving them for a couple of days to dry. The warmth from the bulb is just enough to dry them. Store in a plastic bag or covered bowl.

I use about three tablespoons of white Glue (your choice of brand) and about two tablespoons of brown craft paint. I add a scant quarter teaspoon of avacado and gold to warm the brown a little and just a drop or two of black to tone the color down a bit. May have to experiment with your color to get it just right. Paint it onto your tree framework putting only one coat on your branch tips. Add several layers to the trunk, letting it dry in between. Paint as many coats as needed to cover the wire twists on the trunk and limbs. I keep this in a covered container and add paint and glue as neccessary. (Sounds kind of like a bread starter recipe!)

I use Woodland Scenics foam foliage (model railroad supplies) in a color to match whatever I am making. If you are making a rose bush, punch the petals from paper or use ready made silk leaf garlands for other kinds of trees and bushes. Sometimes you can find these silk leaf garlands in the craft stores. I am sure you could find them online, too.

Hope everyone has a good "rest of the week".