
Cascade Bonsai

Finished the Cascade Bonsai I have been working on. It takes a little while to twist the wire framework and then arrange the branches. After painting, you have to arrange the branches again. When dry you can add the foliage in tiny bunches. Made the pot from regular white Sculpey and then painted with an avacado color craft paint. After that was dry, I aged and antiqued it with a transluscent wiping stain.
The stand is just bent florist wire (18 gauge) painted with Krylon hammered look spray paint in a burnished gold color.

This is the framework I started with. I was able to work a hole into the bottom of the trunk and super glue a heavy wire into that for a handle. I stupidly clipped my roots off before thinking. I added several coats of my glue and paint mixture I keep on hand just for adding "bark". It's easy to add small bumps and creases here and there with your built-up coats.
Below are some pictures of another tree I am working on. Not sure if it will be a bonsai or maybe a standard style rose bush for my florist shop landscaping. Anyway, this is the method I use for any bush or tree I am making. Needless to say, it is a MUST that you study your subject in real life or at least a very good picture of it.
 Start with 28 gauge (or even smaller) craft wire.
 Wind around your hand at least 25 times.
 Put a round dowell in one end of the loops...
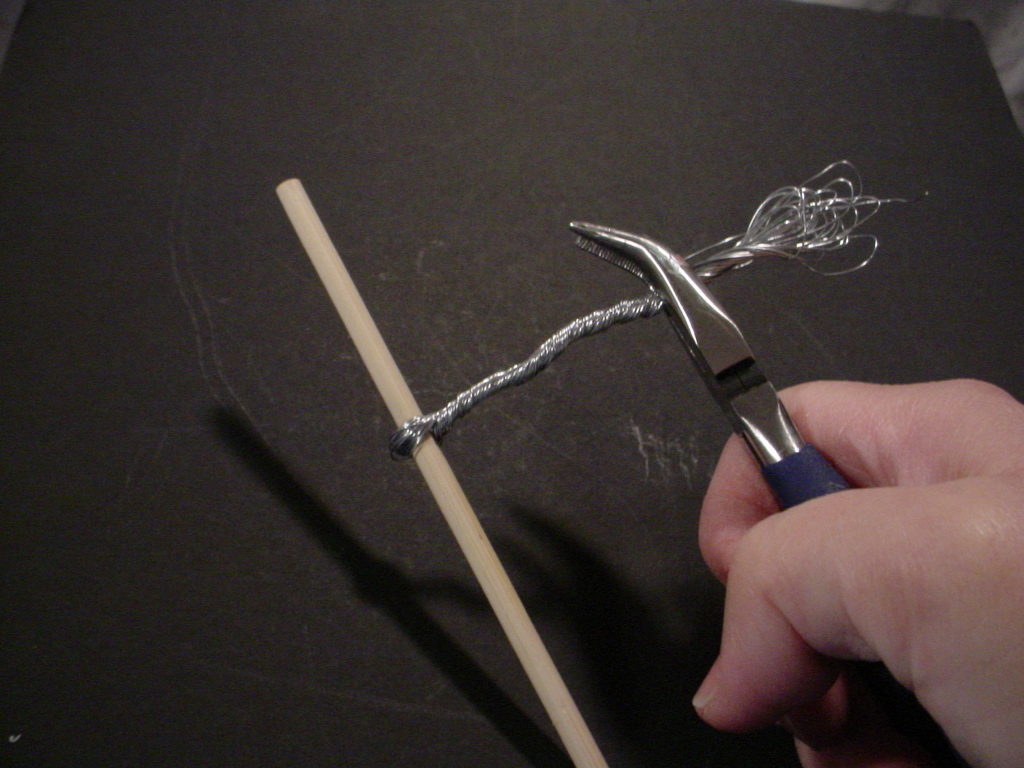 ...then twist a trunk about halfway up.
 Cut the loops on the other end.
 and spread groups of 5 to 7 wires for each limb out from the top of the trunk section.
 Twist each group out to about 1/4 inch then divide the remaining wires of that limb into two or three "forks" or branches and twist those out about 1/8 inch.
  If you need to add another limb, cut several, usually 4, pieces or your wire about 3 inches long, fold in the center and loop around the trunk. Twist tight up to the trunk and out to about 1/4 inch and carry on as for the other limbs.

 Trim the long ends/tips of the branches leaving about 1/8 inch or a little less for each tip.
 Remove the dowell and snip the loops, then spread them out for "roots" to make your tree stand up. Later this is planted, as it were, into your pot or landscaping and covered with glue and soil or mulch. I use dried tea left from my used tea bags. I spread them onto a cookie sheet and put them in my oven with just my oven light turned on, leaving them for a couple of days to dry. The warmth from the bulb is just enough to dry them. Store in a plastic bag or covered bowl.
 I use about three tablespoons of white Glue (your choice of brand) and about two tablespoons of brown craft paint. I add a scant quarter teaspoon of avacado and gold to warm the brown a little and just a drop or two of black to tone the color down a bit. May have to experiment with your color to get it just right. Paint it onto your tree framework putting only one coat on your branch tips. Add several layers to the trunk, letting it dry in between. Paint as many coats as needed to cover the wire twists on the trunk and limbs. I keep this in a covered container and add paint and glue as neccessary. (Sounds kind of like a bread starter recipe!)
 I use Woodland Scenics foam foliage (model railroad supplies) in a color to match whatever I am making. If you are making a rose bush, punch the petals from paper or use ready made silk leaf garlands for other kinds of trees and bushes. Sometimes you can find these silk leaf garlands in the craft stores. I am sure you could find them online, too.
Hope everyone has a good "rest of the week".
Gorgeous bonsai and lovely tutorial! Thank you so much, Gail. xo Jennifer
ReplyDeleteThis bonsai is wonderful! Thanks for the tutorial.
ReplyDeleteBye Faby
Un bonsai precioso!! Y muchas gracias por el tutorial!!
ReplyDeleteBesitos
Great work!
ReplyDeleteGeneviève
Stunning bonsai! Thanks for the tutorial.
ReplyDeleteHugs, Drora
I love your bonsai. Its fabulous. Thanks for the tutorial.
ReplyDeleteIndyPoppy
fantástico!
ReplyDeleteMuy buen trabajo.
ReplyDeleteFeliz Navidad
Un abrazo
Maite