Part 2 of the Wire Laundry Basket
Here it is at long last....
It is very difficult to find enough time to write up a tutorial and add pictures nowadays!
Sorry you have had to wait all this time.
Here it is at long last....
It is very difficult to find enough time to write up a tutorial and add pictures nowadays!
Sorry you have had to wait all this time.
This circle of metal came from a used flood light bulb. It
was at the base of the metal socket.
These are the tabs I cut for my connectors.
I didn’t think of it until after my basket was made but you
can use these instead of cutting a bunch of tabs from the metal and curling them. And
also use them for the bottom of the basket on those brackets.
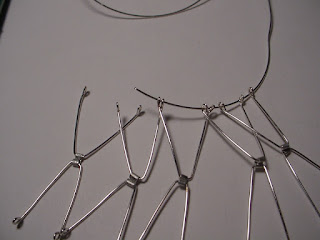
When you get your pieces together they should look like this
Make sure your curls on each end are facing the same way.
Take one of your circles and thread one “leg” of one piece
on, then thread another piece on the same way. Then thread the second leg of
the first piece on. The third piece will then be threaded onto the circle the
same way, just the first “leg” then you will thread on the second leg of the
second piece and so on until you have all of them on. When crossing the legs,
cross them all the same way. And remember your loops and connectors will curl
over to the outside of the basket to avoid snagging your laundry.
Thread the other ends on your second circle in the same way.
Adjust your pieces so that their legs are approximately the
same distance apart. Trim the circles’ ends leaving enough to make a loop on
each end to hook together. Close the loops to hold the ends and keep them from
unfastening. Indicated by the arrow in the top right corner
Measure the bottom of your basket to make sure you don’t get
your “v” pieces legs too long. Don’t forget to allow for a small circle in the
middle for them to connect to.
I put my bottom in before I thought of the next idea. Get
yourself some of these crimp tubes and thread your “leg” wires onto them before
making your end curls. Then make a tight circle with a curl on one end. Thread
your pieces onto the circle through the crimp tube. Make a curl on the other
end of the circle to hook to the other end.
When making brackets to create the bottom, leave the loops
on the ends of the “legs” open enough to hook onto the outer edge of the
circle. Close each loop with pliers after placing on your bottom ring. If you want to get really particular with your measurements and spacing you can figure out how many you will need to make to evenly space them. I was in too big a hurry to finish mine!
I straightened out 4 jumbo paper clips and measured and cut
4 PIECES 3 INCHES LONG. Fold in the center and pinch together a foot; use the
pliers to angle it out a little and then pull the sides out as shown. Clip the
ends even before adding curls to each. Curl the ends to the back.
This is how the legs should look…..leave enough room to loop
the curls onto the bottom circle of your basket.
This shows the feet in place. I added braces by cutting 4
wires (cut these to match the width of your circle-mine were around 2 ½ inches) and curling each end for the 4 sides
and then measured and cut 2 cross braces for the center. I looped them onto the
sides as shown.
The basket does collapse down on itself and I use a ring of
wire inside placed along the middle to keep it open and standing when expanded. I haven’t been able to make the bottom part
collapse and fold up as it does in real life. In real life the whole thing folds flat and can be hung on the wall.
I made this thing by looking at a
picture. I would like to have access to a real life one to see how the bottom
folds.
If I can figure it out I will update everyone.


No comments:
Post a Comment